Codelab 5: EC2 + SQS
Due Date
This codelab is due on Thursday, March 29th at 11:59:59PM. You've been warned: start early! This codelab has a lot of code to read, but in the end you'll get to see how an end-to-end system works that incorporates multiple AWS services that we've used!
Introduction
In this codelab, you'll get to work with SQS.
- You'll test out SQS on the command line.
- You'll create an image thumbnailing service using EC2, SQS and S3.
Before starting, run git pull in the 389Lspring18 directory to update your local copy of the class repository.
Assignment
In this assignment, you will create an image-thumbnailing service.
This service will expose an SQS queue that takes an image and a thumbnail size, then generates the thumbnail and places it into a read-public S3 bucket. You could imagine this service being used in production, where a user would upload their profile image and this service would produce the necessary thumbnails in the background.
Your assignment will be to complete the SQS portions of this service. I'll detail exactly what this includes below.
Thumbnailing Example
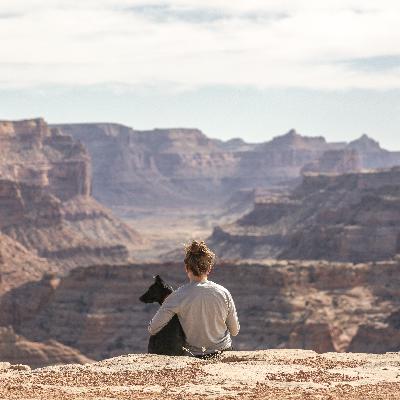
Your service will be able to take images from an S3 bucket, like this one:

https://s3.amazonaws.com/cmsc389l-public/codelab-05/canyon.jpg
And generate a thumbnail just like this:
https://s3.amazonaws.com/cmsc389l-public/codelab-05/output/canyon-400x400.jpg
Seems simple enough, right?
Thumbnailer Architecture
Overall, we want to launch an EC2 instance running a Python script that generates these thumbnail images. This instance will need to talk to S3 to both download the original images, and then again to upload the generated thumbnails.
Hypothetically, we could remove the SQS queue and replace it with an API exposed directly by the EC2 instance. However, what happens if we, say, launch our product and receive a massive spike of users? These new users will all need to create profiles and their profile images will need to be thumbnailed. Will the single EC2 instance be able to handle all of these requests?
Most likely, the EC2 instance will not be provisioned with enough capacity, so it will crash. By introducing a queue in-between, other services can drop thumbnail requests into the queue and the spikey load will be spread out -- some thumbnails may take longer to generate, but the server won't crash!
Let's dive into the nitty-gritty to understand how everything will work.
Thumbnailer Code
Enter your environment in the usual way by running:
$ pipenv shell
The source code for this service is stored in /codelabs/codelab-05/.
codelabs/codelab-05/ $ tree
.
├── config.py
├── image.py
├── README.md
├── scripts
│   ├── clear_env.sh
│   └── ec2_setup.sh
├── setup.py
├── upload.py
└── utils.py
You are given a significant amount of boilerplate to handle most of the non-SQS portions of this service.
Make sure you have the proper dependencies from the Pipfile with the command:
$ pipenv install
Instructions
This is a codelab that can be worked on in an iterative nature -- there are three methods to implement and you can tackle them one-at-a-time. The following sections will explain the purpose of each file.
Implement
initialize_queue()inutils.pyto completesetup.py. You can now usesetup.pyto configure the full AWS environment this codelab uses. Use the AWS CLI or the Management Console to double-check that everything is created correctly. Test out the DLQ and make sure that messages end up in it after not being deleted after a certain number of receives.Then, implement
send_messages()inupload.py. You can double-check this works by posting messages and making sure that you can poll them from the Management Console.Next, implement the
run()method inimage.pyto poll and process messages from the SQS queue. Even though this will run on EC2, you can test it locally. It's quicker that way! Useupload.pyfrom the previous step to submit thumbnailing requests to the queue for testing.Finally, test everything out end-to-end! Remember that you can SSH onto the EC2 instance to look at the
/var/log/cloud-init-output.loglog file to make sure that your code is executing correctly on the EC2 instance.
Setting up the Environment (setup.py / utils.py)
This service will use boto3 and Python to automatically configure its environment. All of this setup is done in setup.py, though all of the edits that you need to make are in utils.py. As an overview, it will do the following things:
- Create an SQS queue with a dead-letter queue to catch any thumbnail requests that do not get processed properly. (
--queue)- You'll need to attach a RedrivePolicy to the main queue which contains the ARN of the Dead-Letter queue.
- Create two S3 buckets: (
--buckets)- One to host the generated thumbnails.
- And another to transfer your Python code onto an EC2 instance.
- Upload your EC2 code into the latter bucket. (
--upload_code) - Create an EC2 instance profile (see below for more details). (
--profile)- This will also create the EC2 role, attach S3 and SQS policies, and attach the role to the instance profile.
- Create a security group that enables key-based authentication on the EC2 instance. (
--security_group) - Finally, it will create the EC2 instance and run a setup script (
scripts/ec2_setup.sh) that will configure a Python environment, install dependencies, and then executeimage.py.- This EC2 instance will be configured with the specified keypair (
--keypair)
- This EC2 instance will be configured with the specified keypair (
You can run these steps individually, like so:
$ python setup.py --queue
Or, all together, like so:
$ python setup.py --all --keypair colink-cmsc389l
Note that if you run the --instance step, then you will need to specify a keypair.
EC2 Instance Logs
Some of the Amazon AMIs, like the Ubuntu image that we use, come pre-configured with cloud-init. This is an open-source package created to help bootstrap computing environments on Linux boxes. In this case, this is used to execute our setup script as user data on the Ubuntu instance. The important part here is that cloud-init configures a log, in /var/log/cloud-init-output.log, which logs all stdout and stderr when executing user data scripts (in our case, scripts/ec2_setup.sh).
Therefore, this log provides valuable insight into what is happening on your EC2 box. You will want to look to this log to debug any issues on the instance.
A helpful command here is tail -f. The tail command allows you to look at the end of a file (it is the opposite of the head command), but the -f flag will instruct the tail command to wait and print any additional data that is appended to the end of the file. Thus, you can SSH onto your box and then run tail -f /var/log/cloud-init-output.log to watch as your box is configured.
Remember that you can access your EC2 box with SSH using the following command (the output of setup.py will give you the IP address):
$ ssh -i ~/keys/<keypair name> ubuntu@<ip address>
Instance Profiles
Don't get too hung up on the terminology here, but just like we created an IAM user that we could sign in with to access our AWS account via the CLI, we can also create IAM roles to give to EC2 instances.
These IAM roles/users can be given policy documents which specify exactly what permissions they have. By default, EC2 instances have no permission to access any of your other AWS resources (this is great for security!), you have to explicitly grant it.
However, an IAM instance profile is something different. It is a container for an IAM role that is used to give temporary credentials to an EC2 instance. Specifically, instance profiles have a single job: they allow EC2 instances to "assume" an IAM role.
Usually, if you assign an IAM role to an EC2 instance in the Management Console, it actually implicitly creates an instance profile behind-the-scenes. However, we're launching everything from the CLI so setup.py explicitly creates one. Check out initialize_instance_profile() in utils.py to see how this happens.
Keep in mind that you can only assign a single instance profile to an EC2 instance, and each profile can only contain a single role. However, you can assign as many policies to a role as you need. For example, in this codelab we assign two policies to our role: AmazonS3FullAccess and AmazonSQSFullAccess.
If the difference between the three of these is not yet clear, Matt Houser wrote a good Quora answer on this subject here: https://www.quora.com/In-AWS-what-is-the-difference-between-a-role-and-an-instance-profile/answer/Matt-Houser-3
Image Thumbnailing (image.py)
The EC2 instance will run a Python script that will poll the SQS queue to listen for new thumbnail requests. Upon receiving a message, it will download the referenced image from S3 into a local directory (local_originals_dir). Then, it will generate a thumbnail of the specified size using the generate_thumbnail() function that is provided to you. This function will drop the thumbnail into a local directory (local_thumbnails_dir). Finally, it will upload this thumbnail into a different S3 bucket (S3_OUTPUT_BUCKET) with a public-read ACL so that they can be accessed by other users. After processing a message, image.py should just return to polling for new messages to handle.
Note that just like the previous S3 codelab, you will need to consider the Content-Type of these images. If you do not specify the Content-Type of the image when you upload it to S3, then it will default to octet-stream. You can just set it to image/jpg.
Uploading SQS Messages (upload.py)
You will also need a script to upload thumbnail requests into the SQS queue. upload.py is responsible for that.
The SQS messages can follow the following format:
{
    bucket: <string>,
    key: <string>,
    width: <int>,
    height: <int>
}
An example message may look like this:
{
    bucket: "cmsc389l-public",
    key: "codelab-05/owl.jpg",
    width: 400,
    height: 400
}
However, you are welcome to change the format of these SQS messages, if you would like to incorporate other fields (such as an optional internet URL, or an array of sizes). If you do, document that you did that so that I can take a look!
Cleaning your Environment (scripts/clean_env.sh)
This codelab will set up a handful of AWS services that you will want to shut down afterwards. I have provided a shell script (./scripts/clear_env.sh) which will delete these resources for you. Feel free to use it while testing, too (especially setup.py!).
You may need to install the jq command from your OS's package manager. Depending on your system, run apt-get install jq (Ubuntu) or brew install jq (macOS).
Note that there is a timeout after deleting a queue, which prevents you from re-creating the queue within 60 seconds.
Make sure to change the UMD_USERNAME environment variable before running this yourself.
Configuring your Environment (config.py)
The configuration of your environment is set up in config.py. You can leave this alone for the most part, however you will need to set your USERNAME. This helps with grading, so that multiple students resources will not conflict. It also prevents global resources from conflicting (like bucket names).
Deliverables
Here's is specifically what you need to implement to get this service working:
- Complete
initialize_queue()(forsetup.py)- Initialize the SQS queue and Dead-Letter queue
- Complete
send_messages()inupload.py- Generate the SQS message
- Send this message into the SQS queue
- Complete
run()inimage.py- Continuously poll the SQS queue
- Once a message is received, download the image from S3 that is pointed to by the SQS message
- Generate a thumbnail with
generate_thumbnail() - Upload the thumbnail into S3 with a public-read ACL and correct Content-Type
Testing
I will be testing your script by running the setup script, then submitting a handful of thumbnail requests into your SQS queue which reference images hosted in the cmsc389l-public bucket under the codelab-05 folder.
I will run the following commands, which should produce the same thumbnails as those in the codelab-05/output folder in the cmsc389l-public bucket.
$ python setup.py --all --keypair colink-cmsc389l
...
$ python upload.py --bucket cmsc389l-public --keys codelab-05/canyon.jpg --height 400 --width 400
$ python upload.py --bucket cmsc389l-public --keys codelab-05/dancing.jpg --height 600 --width 300
$ python upload.py --bucket cmsc389l-public --keys codelab-05/owl.jpg --height 100 --width 150
$ python upload.py --bucket cmsc389l-public --keys codelab-05/skyline.jpg --height 400 --width 1000
$ python upload.py --bucket cmsc389l-public --keys codelab-05/street.jpg --height 49 --width 51
...
Submission
Submit a zipped version of the codelab-05 folder containing all files. Turn in this zip file to the CS submit server.
You can shut off all of the resources in this codelab once you finish (by running the clean_env.sh script).